 Fulfillment Management
![]()
After all autoresponders and documents have been created and packaged, OpsAdmin provides multiple tools to manage the delivery of customer communications. These tools allow users to track, generate, and send documents efficiently.
Available fulfillment options include:
-
Letter Queue – Manage and track physical letters prepared for printing and mailing.
-
Email Manager – Oversee and monitor email communications sent to customers.
-
Renewal Notices – Automate and manage the generation of renewal-related documents.
-
Reprint / Resend Documents – Quickly regenerate or resend specific documents as needed.
Each tool is designed to support a streamlined and flexible fulfillment process tailored to your operational needs.
 Letter Queue Purpose and Workflow
![]()
The Letter Queue compiles all dynamically generated documents, autoresponders, and uploaded files that have been packaged and are ready for customer delivery. This centralized queue presents the documents to the Operations Administrator for printing and distribution.
The workflow supports two fulfillment approaches:
-
Mass Printing: Large batches of documents can be packaged into a single file and sent to a third-party printing vendor for bulk processing.
-
Localized Printing: Individual documents can be reviewed and printed in-house for more targeted or manual fulfillment needs.
This flexible structure ensures efficient management of customer communications across various operational scales.
 Accessing the Letter Queue
![]()
To manage printed communications, navigate to the “Letter Queue” sub-menu in OpsAdmin. This section displays a list of all letters generated based on the configured document triggers.
From the Letter Queue, users can:
-
Filter the list of generated letters by various criteria
-
Generate PDF files of documents for printing
-
Track the status of each letter (e.g., pending, printed, archived)
-
Preview letters before printing
-
Archive letters after they have been printed
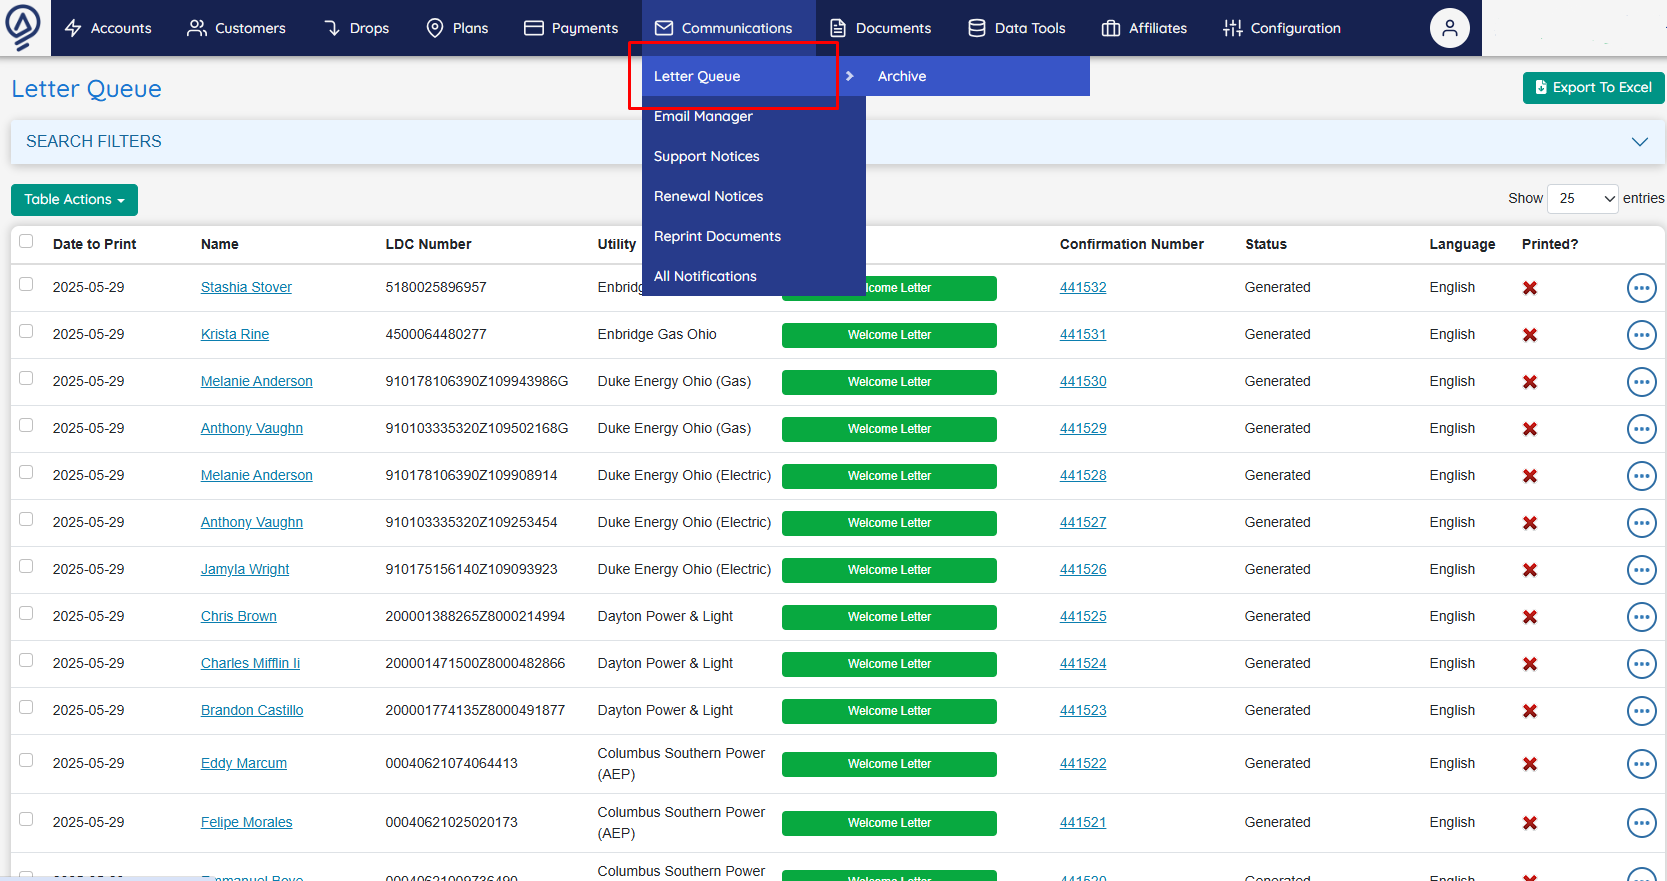
This tool ensures accurate oversight and control of all physical document fulfillment activities.
 Printing Letters
![]()
OpsAdmin offers three options for printing letters from the Letter Queue:
-
Print All – Print every letter currently listed in the queue.
-
Print Selected – Print only the documents you select using the checkboxes.
-
Print Single Document – Print an individual letter by clicking the three-dot icon in the far right column and selecting "Print" from the dropdown menu.
Each selected option will compile the documents into a PDF, which can then be printed internally or sent to a third-party printing vendor.
Steps to Print:
- To print all documents, click “Print All.”
- To print selected documents, check the boxes next to each desired letter, then click “Print Selected.”
- To print a single document, click the print icon on the dropdown inside the three-dot icon.
 Printing Status
![]()
The Letter Queue allows users to track the progress of each letter through various fulfillment stages. These statuses can be used to align with internal processes and ensure accurate tracking.
Available Statuses:
-
Generated – The letter has been created and is ready for packaging.
-
Printed – The letter has been printed.
-
Packaged – The letter has been compiled into a PDF for printing.
-
Mailed – The letter has been sent out.
-
Opted_Out – The customer has opted out of receiving this type of package.
When a user prints a letter, the “Printed?” icon will automatically update from an “X” to a checkmark to indicate completion.
OpsAdmin allows you to manually update the status of letters in two ways:
Bulk Update:
-
Select the checkboxes next to the letters you want to update.
-
Click the “Table Actions” button.
-
Select “Change Status” from the dropdown menu.
-
Choose the new status you want to apply to all selected letters.
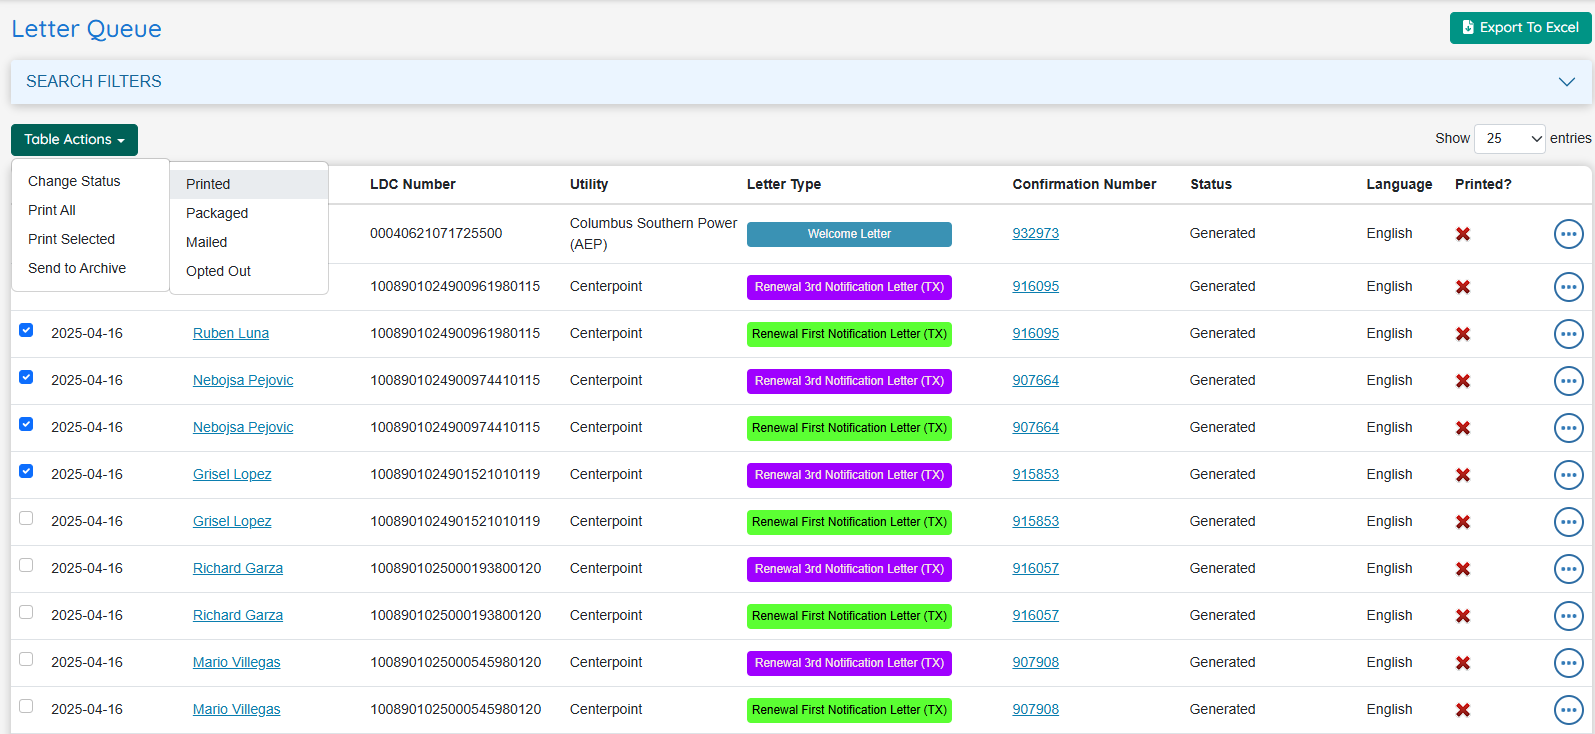
- A confirmation warning will appear, giving you the opportunity to cancel.
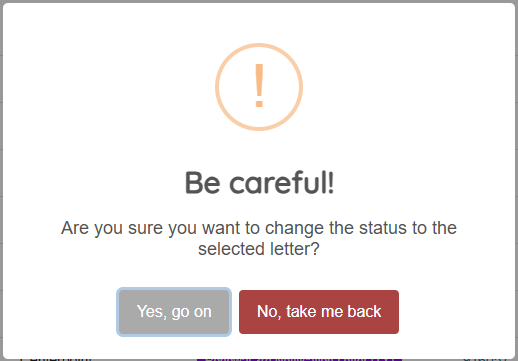
- Click “Yes, go on” to confirm and apply the changes.
Individual Update:
- Use the status dropdown directly within the row of the letter you wish to update.
These options provide flexibility for managing fulfillment statuses efficiently—whether updating a single letter or processing changes in bulk.
 Letter Queue Archive
![]()
Once a letter’s status has been marked as Mailed, it can be archived to maintain a historical record of the fulfillment process. Archiving helps keep the Letter Queue organized and ensures long-term tracking of printed communications.
Accessing the Archive:
To view archived letters, go to the “Letter Queue Archive” tab located within the Letter Queue menu.
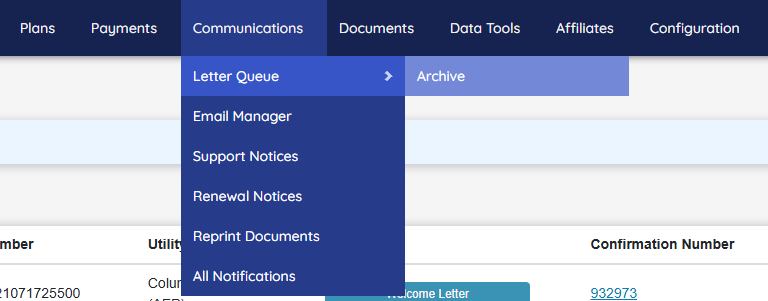
There are two ways to archive letters in OpsAdmin:
Archive Multiple Letters:
-
Select the checkboxes next to all letters you want to archive.
-
From the dropdown menu in the upper-left corner, choose “Send to Archive.”
-
A confirmation prompt will appear—click “Yes, go on” to complete the action.

2. Archive a Single Letter:
- Select a single letter and follow the same steps as Multiple Letters
This process ensures that all fulfilled letters are properly stored and retrievable for auditing or reference.
 Email Manager Overview
![]()
The Email Manager, similar to the Letter Queue, handles the delivery of packaged documents and autoresponders—except via email instead of print.
The key distinction is in how content is processed for digital delivery:
-
Autoresponders are automatically converted into the Subject and Body of the email message.
-
Documents are attached to the email either as individual files or as a combined PDF, depending on configuration settings.
Additionally, the Email Manager intelligently organizes and prioritizes outgoing messages to ensure timely and efficient delivery to customers. This tool is ideal for managing high-volume or automated email-based fulfillment workflows.
 Accessing the Email Manager
![]()
To manage email communications, navigate to the “Email Manager” sub-menu in OpsAdmin.

This section displays all autoresponders that have been sent—or are scheduled to be sent—to customers via email.
Within the Email Manager, users can:
-
View and update the status of outgoing emails
-
Preview the exact email content sent to the customer
-
Send a test email to verify formatting and delivery before sending to customers
This interface provides a streamlined way to monitor and control all automated email communications.
 Email Manager Details
![]()
The Email Manager provides a comprehensive view of all customer emails generated and sent through OpsAdmin. It includes key data points for tracking and managing email communications, along with actionable tools.
Visible Columns in the Email Manager:
-
LDC Number – The Local Distribution Company identifier
-
Utility – The associated utility company
-
Sender – The email address from which the message was sent
-
Recipient – The customer's email address
-
BCC – A blind copy sent to a designated internal inbox for record-keeping
-
Priority – Indicates the urgency or processing order of the email
-
Date Added – The date the email was generated in the system
-
Date Sent – The date the email was successfully sent
-
Enrollment / Prospect ID – Clickable link to view the customer's record in the Enrollment or Prospect Manager
-
Mail Type – Defines the purpose or category of the email (e.g., Renewal, Confirmation)
-
Mail Status – Displays the current delivery status (e.g., Pending, Sent, Failed)
Embedded Email Content (Not Shown in Main Table):
-
Email Subject – The subject line of the email
-
Email Body – The full viewable content of the email message
Available Actions (Three-Dot Menu):
-
Preview Email – Opens a full preview of the email that was or will be sent to the customer
-
Change Status – Allows the user to update the current mail status
-
Send New Email – Sends a test or new version of the email to a specified email address
These features allow for precise control, monitoring, and testing of all email-based customer communications.
 Viewing, Testing and Editing Email Status
![]()
The Email Manager allows users to view the contents of an email, send test emails, and update the email status as needed.
Viewing an Email
- Click “Preview Email” in the three-dot icon menu.
Sending a New or Test Email
- Click “Send New Email” in the three-dot icon menu.
- Enter the destination email address in the popup.
- Select “Send”
- The system will generate and send a test version of the email to the specified address.
Editing Email Status
- Click “Change Status” in the three-dot icon menu.
-
Choose a new status from the dropdown list:
- Bounced
- Error
- No Action Required
- On Hold
- Opted Out
- Pending
- Send
-
Click “Yes, go on.” to apply the updated status.
 Renewal Notices Overview
![]()
Unlike most fulfillment documents that are triggered by user actions or system events, Renewal Notices are generated based on contract end dates.
During the market setup process, users define how many days prior to a contract's expiration the renewal notice should be generated. Once created, these documents are routed to either the Letter Queue or the Email Manager for fulfillment.
Due to regulatory requirements and the time-sensitive nature of renewals, OpsAdmin includes a dedicated Renewal Notices menu. This menu provides:
- A complete view of all active and upcoming renewal notices
- Tracking tools to ensure notices are sent within the required timeframes
This dedicated interface helps users maintain compliance and stay ahead of contractual deadlines.
 Accessing Renewal Notices
![]()
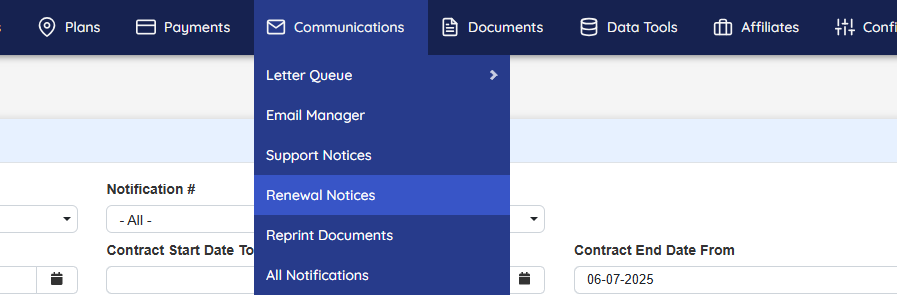
To manage renewal communications, navigate to the “Renewal Notices” sub-menu in OpsAdmin.
Filtering Renewal Notices
Use the search filters to select the appropriate utility and any other criteria needed to narrow results based on your desired timeframe or customer segment.
Renewal Notice Menu Details
The Renewal Notices menu displays detailed information for each customer contract, including:
-
LDC Account – Local Distribution Company identifier
-
Business/First/Last
-
Status – Current customer status within OpsAdmin
-
Sub Status – Customer status in the billing system
-
Utility
-
Market
-
Notification Type – Delivery method (Letter or Email)
-
Notification Rule – Number of days before contract end to generate the renewal notice / Type
-
Notifications (Status and Date) – Color dictates the status. Green is sent / Red is not
-
Contract Start Date
-
Contract End Date
Available Actions
-
Send 1st Notification – Manually trigger first renewal notice (individual or mass)
-
Send 2nd Notification – Manually trigger second renewal notice (individual or mass)
This menu ensures renewal communications are properly timed and documented, supporting compliance with regulatory requirements.
 Manually Sending Renewal Notices
![]()
In cases where an account’s status changes—such as a reinstatement—users may need to manually send the renewal notice to the appropriate fulfillment queue.
There are two ways to do this:
1. Bulk Send for Multiple Accounts
-
Select the checkboxes next to the accounts you wish to update.
-
Choose the appropriate notification (1st or 2nd) from the dropdown menu.
-
Click “Send” to deliver the notices to the Letter Queue or Email Manager.
2. Send for a Single Account
- Click the corresponding action icon in the account’s row for the renewal notice you want to send.
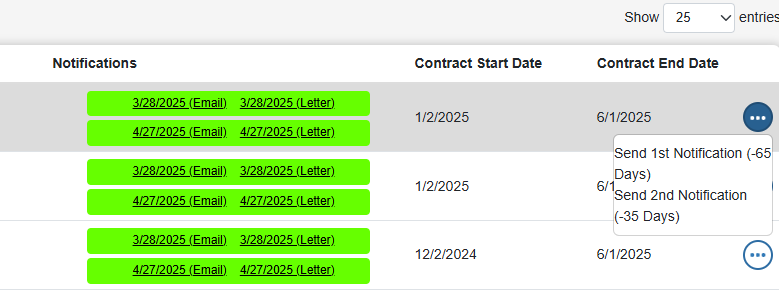
This manual option ensures that renewal notices can still be delivered promptly after changes in account status.
 Reprint Documents
![]()
The Reprint Documents area in OpsAdmin allows users to resend historical documents, either in their original format or as the most current version, depending on operational needs.
All documents that have been previously mailed or emailed are stored in OpsAdmin with their date and time of creation, preserving a complete historical record.
Key features include:
-
Access to historical versions of all sent documents
-
Preview capability to review document content before resending
-
Flexible delivery options, allowing users to send documents to alternate email addresses or locations as needed
This tool is ideal for customer service and compliance scenarios where document retrieval and resending are required.
 Accessing Resend Documents
![]()
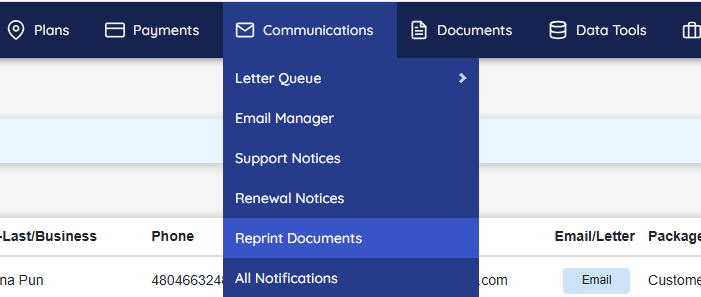
To reprint or resend previously issued documents, navigate to the “Reprint Documents” sub-menu in OpsAdmin.
Using the Search Filter
A search filter is available to help you quickly locate specific documents by narrowing results based on customer details or other criteria.
Available Document Information
The menu displays the following details for each document:
-
LDC – Local Distribution Company identifier
-
Username – The OpsAdmin user who processed the original communication
-
First-Last / Business
-
Phone
-
Email
-
Email/Letter – Indicates whether the communication was a Letter or Email
-
**Package ** – The correspondence package the document belongs to
-
Date Created – The original creation date
-
Date Sent – The original send date
-
Status – Current status of the correspondence
-
Actions – Includes tools to interact with the document:
-
Preview Letter (or Email)– Click the three-dots icon and select Preview Letter or Preview Email to preview the content
-
Regenerate Mail – Click the three-dot icon to generate a new version for resending
-
Both letters and emails can be regenerated using this functionality, offering flexible support for follow-ups, corrections, or customer service needs.
 Regenerating a Letter or Email
![]()
To regenerate and resend a previously sent email, follow these steps:
-
Click the three-dot icon on the right side of the document row.
-
Select “Regenerate Mail.”
-
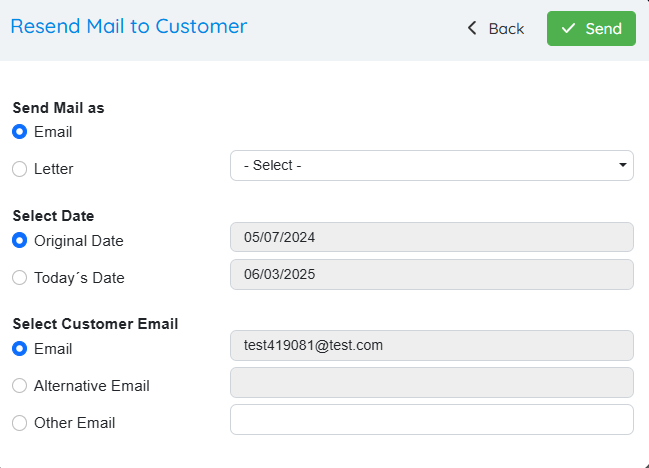
Choose the correspondence type: Email or Letter.
-
Select the specific notification or document type from the dropdown menu.
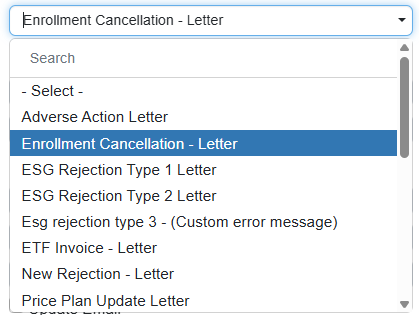
- Choose the date to apply:
-
Original Date – To create an exact replica of the original document
-
Today’s Date – To generate a new, updated version with the current date
-
- For emails: 3. If the email address is unchanged, select Email. 4. If sending to an alternate stored email, choose Alternative Email. 5. If a new address is needed, select Other Email and enter the new email address manually.
-
Confirm the selected email option by checking the appropriate box.
-
Click “Send” to finalize and resend the document.
This streamlined process ensures accurate and flexible document fulfillment when reprinting or resending is required.